
Most cannot deny the charming appeal of woven English wattle edging; and do you know just how easy it is to make?
English settlers brought the craft of making wattle to America, and even today in colonial Williamsburg the basket-weave rustic charm of wattle is used as a pedestrian barrier. But more than that, wattle can insulate young seedlings by blocking wind and can also elevate an otherwise ho-hum raised bed into a bedded charmer.
No raised beds? Make them! Wattle can also be used as a way to contain raised soil.
Traditionally in England, each February, willow trees designed to provide withy (the weavers) are coppiced (cutting limbs to stimulate growth), and once cut, withy re-growth is ready to use after two to three seasons. This re-growth provides suckers thick and long enough to use in wattle. As you can imagine, crafting wattle edging is the ultimate sustainable, renewable resource.
But that is where the tradition stops. The lore of crafting wattle seems to be a lost art in America. Why? I believe it’s because of the process of finding the wood. We aren’t in the habit of coppicing our willows to wattle. Today in the Triangle area, we are bringing back this craft with our own twist.
Don’t have a willow to coppice? Don’t let the lack of finding pliable willow limbs stop you. You can also use grapevine or wisteria, plus other supple vines.
Materials Needed

Gather Materials
Sales — These are the upright stakes. Any odd number of sales can be used, depending on the desired length or tightness of the wattle. Two of these sales need to be longer for the ends. Hardwood is a good choice for the sales. Keep in mind, if you use willow as the sales, it might take root and come alive. It will turn out stronger, but you will need to trim it each year.
Weavers — Any supple, long, straight, slender saplings make good weavers. Wisteria, grapevine, forsythia, and even willow can be used. Newly cut, green wood is best and easiest to use. The saplings you choose should be long enough to weave around at least three stakes, preferably more for stability. Because the weavers are woven horizontally, a fence can be as low or as high as your sales will allow. Don’t worry about willow taking root. As long as it isn’t used as sales, but only as the weavers, it’s not likely to generate growth. Expect your wattle edging to last three or four years.
You will also need snipers or pruners to cut the wood.
Steps to Making a Wattle
1) Gather materials and strip the green off the sales and weavers.

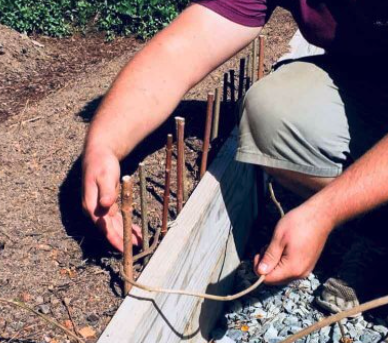
Sink sales before proceeding
2) Sink the two longer end sales 50 percent into the ground with the other 50 percent above ground. For the shorter sales, sink these one-third deep with the tops equal to the end sales. We placed the sales against a long board to keep these in a straight line.
Note: The length of the wattle is what you choose, but it’s easiest to work in three to five foot sections. Too short and the wattle doesn’t have the same appeal; too long and the weavers become difficult to use. The height can be whatever you desire. This example is for wattle edging, spaced at equal intervals. It doesn’t have to be, though, as the spacing can vary for different effects. For our illustrations, we spaced our sales three inches apart to make a wattle three feet long.
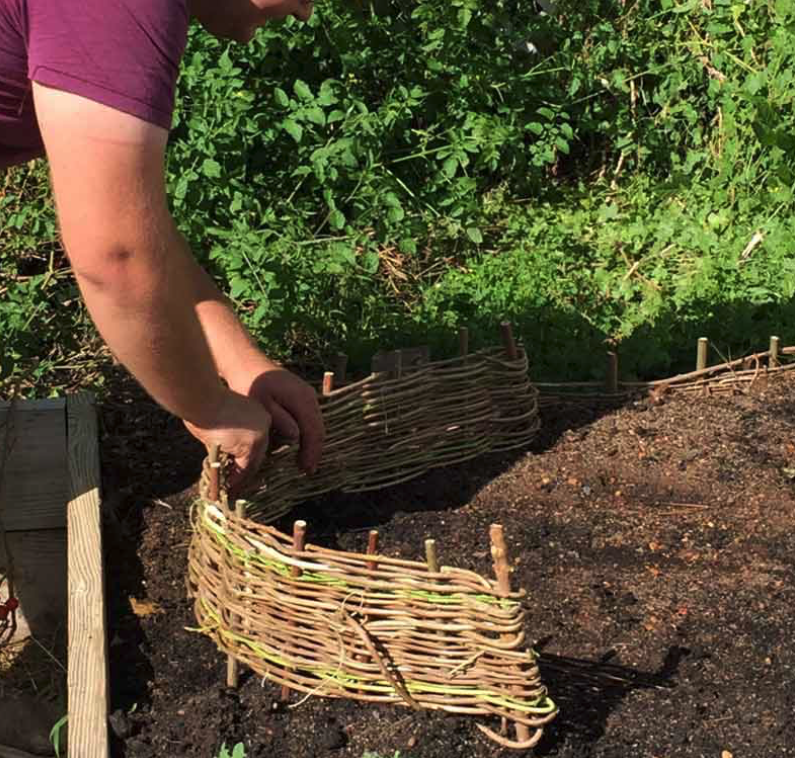
Step 3 Weaving a woven wattle edge
3) Start the weaving two sales in from the end and then work backwards to the end sale, alternating sides of the sales as you weave. The weavers are woven around the sales like basketry. Continue to alternate the weaving the length of the wattle and around the opposite end sale. The simplest is to weave each row of saplings alternating around the stakes. The next row is woven on the opposite side of the stake from the sapling below it. This is why an odd number of sales is necessary. Each row should be firmly pressed down. When you finish using one weaver, go back two sales to begin using the next weaver. This will help stabilize the weave. When finished with the wattle, the end weaver is just tucked in.
At home, I grow muscadines. When it is time to do a major pruning in January, the vines will be saved for weavers. Now, every time I see a vine I see future weave for wattles that I want to craft for my gardens. I hope you do too.
Naturally, Helen